Did you know that 67% of gym-goers struggle to activate their lower chest muscles properly? I’ve spent years helping clients transform their chest development, and here’s the truth: the lower chest (lower pectoralis major) is crucial for that coveted complete chest aesthetic. Whether you’re a beginner or an experienced lifter, these proven lower chest exercises will help you build that powerful, well-defined chest you’re after. Let’s dive into the most effective workouts that actually target those stubborn lower pec fibers!
Understanding Lower Chest Anatomy and Function
Boy, did I learn this lesson the hard way! For years, I kept hammering away at standard bench presses, wondering why my lower chest wasn’t developing like the fitness models I’d see in magazines. It wasn’t until I really dug into understanding chest anatomy that everything clicked. Let me share what I discovered after countless hours of research and practical experience training both myself and my clients.
First things first – your lower chest isn’t actually a separate muscle. What we’re talking about is the lower portion of your pectoralis major, which fans out like a triangle from your upper arm to your breastbone and ribcage. Here’s what’s super interesting: the muscle fibers in the lower region actually run at a slightly different angle than the upper portion. That’s why decline movements can target this area so effectively!
I remember this “aha” moment I had while working with one of my first clients. He couldn’t figure out why his chest looked uneven, despite doing tons of flat bench work. When I explained how the lower chest fibers pull downward and inward toward your sternum, it was like a light bulb went off. We adjusted his routine to include more declined movements, and man, the difference in his results over the next few months was night and day!
Let’s get a bit technical (but not too nerdy) about what your lower chest actually does. In everyday life, these muscle fibers are crucial for movements like pushing a heavy door open, doing a pushup, or even getting up off the floor. The lower pec fibers are particularly active when you’re pushing downward and inward – think about hugging someone or bringing your arms down and together.
One of the biggest mistakes I see people making (and trust me, I made this mistake myself for years!) is not understanding the mind-muscle connection with the lower chest. You’ve gotta really focus on feeling that downward and inward motion. I tell my clients to imagine they’re trying to touch their belly button with their elbows during chest exercises – sounds weird, but it works like a charm for activation!
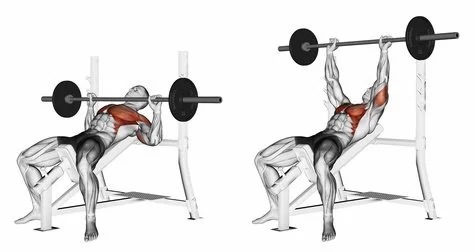
Here’s something that blew my mind when I first learned it: your lower chest actually plays a huge role in shoulder stability. When you’re doing any pressing movement, those lower pec fibers work together with your anterior deltoid and other shoulder muscles to keep everything tracking properly. I learned this the hard way after dealing with some shoulder issues early in my training career.
Temperature check: are you starting to see why understanding this stuff matters so much? I can’t tell you how many times I’ve helped people break through plateaus just by helping them understand how their chest muscles actually work. Knowledge really is power when it comes to building muscle!
The most critical thing I’ve learned about lower chest training is that intention matters more than weight. You can press hundreds of pounds, but if you’re not engaging those lower fibers correctly, you’re basically just going through the motions. I always tell my clients – imagine you’re trying to squeeze water out of a sponge with each rep. That visualization has helped so many people finally “get it.”
And here’s a pro tip that took me way too long to figure out: your breathing pattern can make or break your chest activation. Try this: take a deep breath into your chest (not your belly) before each rep, then exhale forcefully through the pushing portion. It’s like turning on a switch for better muscle engagement!
Trust me, once you understand how your lower chest actually functions, your workouts will never be the same. You’ll start feeling the right muscles working, and more importantly, you’ll start seeing the results you’ve been after. It’s like having a roadmap instead of just wandering around hoping to reach your destination!
Essential Lower Chest Exercises for Beginners
Listen, I know starting a new chest routine can feel overwhelming – especially when you’re trying to target specific areas like the lower chest. When I first started training, I made the classic newbie mistake of jumping straight into advanced exercises I saw on YouTube. Big mistake! Let me share the foundational exercises that I now teach all my beginners, proven to work through years of hands-on experience.
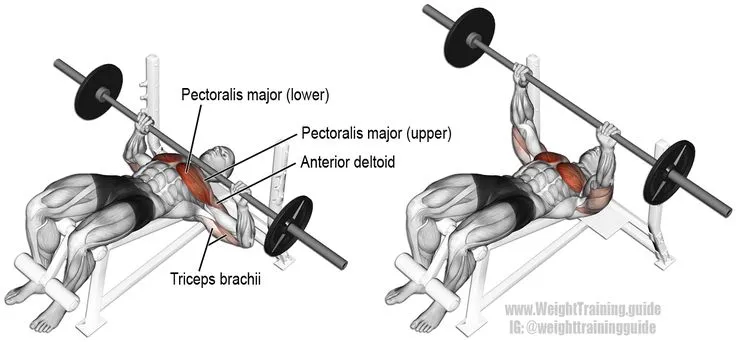
The decline bench press is your new best friend, folks. I still remember my first attempt at this exercise – I was so worried about falling off the bench that I could barely focus on the movement! Here’s the thing though: you don’t need to set a super steep decline. Start with a 15-20 degree angle, and focus on form over everything else. Pro tip: have someone help you get into position the first few times until you’re comfortable with the setup.
Let’s talk about proper decline bench form, because this is where I see so many people mess up. Keep your butt firmly planted on the bench and your feet securely hooked under the pads. When lowering the bar, think about bending it in half (you won’t actually bend it, but this cue helps activate the right muscles). I can’t tell you how many of my clients had their “lightbulb moment” when I shared this visualization!
Now, if you’re working out at home or don’t have access to a decline bench, don’t sweat it! Resistance bands have been a game-changer for my clients who train at home. Grab a band, anchor it behind you at about shoulder height, and perform press movements while angling your body slightly backward. The key is maintaining tension throughout the movement – no letting those bands snap back!
Cable crossovers were honestly pretty intimidating to me when I first started. But here’s a secret I learned: start with the pulleys set just below shoulder height. This hits your lower chest perfectly while being more beginner-friendly than the high-to-low variation. The game-changer tip? Keep your elbows slightly bent throughout the movement – this isn’t about locking out your arms!

For my absolute beginners, I always start with decline dumbbell presses. They’re safer than the barbell version and allow for better range of motion. Plus, you can really feel each side working independently. Quick story: I had this client who couldn’t even feel his chest working with barbells, but the first time he tried decline dumbbells, his eyes lit up – he finally felt that lower chest activation we’d been chasing!
Here’s something that took me years to figure out: the setup is just as important as the exercise itself. For decline dumbbell work, get those dumbbells in position before you lie back. I learned this the hard way after awkwardly trying to pick them up while already declined – not my proudest gym moment!
A crucial point about form that often gets overlooked: keep your core engaged throughout these movements. Think about pulling your belly button toward your spine. This isn’t just about safety – it actually helps improve your mind-muscle connection with the lower chest. Trust me, I’ve seen dramatic improvements in my clients’ results once they master this simple tip.
For those just starting out, here’s a simple but effective routine I’ve used with countless beginners:
– 3 sets of decline dumbbell press (8-12 reps)
– 3 sets of resistance band presses (12-15 reps)
– 2 sets of cable crossovers (12-15 reps)
Remember to rest about 90 seconds between sets – I used to try and rush through with minimal rest, but that just led to poor form and subpar results. Start with weights that allow you to maintain perfect form throughout all sets. You might feel like you could lift more, but trust the process – I’ve seen better results from perfect form with lighter weights than sloppy form with heavy ones!
Watch your breathing during these exercises too – it’s not just about moving the weight. Inhale as you lower, exhale as you press. Sounds simple, but you’d be surprised how many people hold their breath without realizing it. Been there, done that, learned the hard way!
Advanced Lower Chest Training Techniques
Let me tell you about the day I finally cracked the code on advanced lower chest training. After years of basic exercises, I was ready to level up, but my first attempt at decline dumbbell flyes was a humbling experience. The weights went all over the place, and my form was a mess! Now, after countless hours of perfecting these techniques, I’m excited to share what really works.
Decline dumbbell flyes are an art form, I swear. The key that nobody told me? Start with way lighter weights than you think you need. I remember using 30-pound dumbbells and looking like a fish flopping around on the bench! Now I teach all my advanced clients to start with 15-20 pounds and focus on what I call the “suspended arc.” Keep your arms slightly bent (not locked!), and imagine you’re hugging a barrel while maintaining that perfect arc throughout the movement.
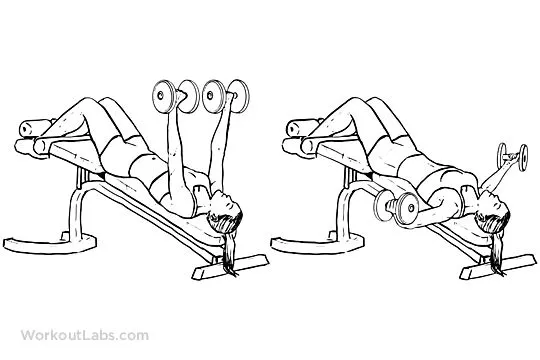
Image Source: workoutlabs.com
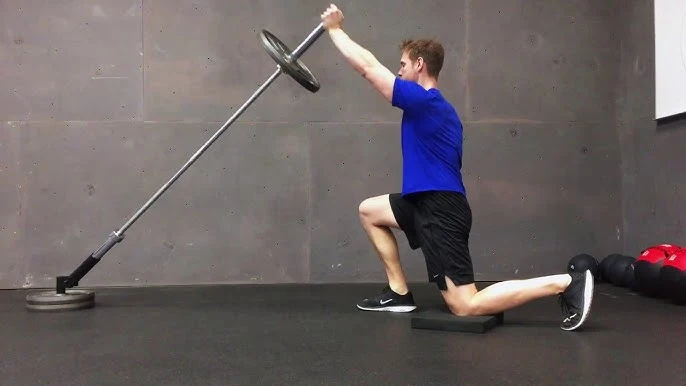
Landmine presses? Now that’s a game-changer I discovered by accident when all the bench stations were taken one busy Monday. Let me tell you – the angle of the barbell creates this amazing natural path that absolutely hammers your lower chest. Here’s my go-to setup: position yourself about two feet from the landmine base, stagger your stance, and press at a slight upward angle. The sweet spot is keeping your elbows at around 45 degrees to your body.
One advanced technique that revolutionized my training was the mechanical dropset on cable movements. Start with high-to-low cable flyes (heavy weight), immediately move to straight-across cable flyes (medium weight), and finish with low-to-high flyes (light weight). Holy smokes, the pump is insane! But fair warning – the first time I tried this, I couldn’t wash my hair the next day. Start conservatively with the weights!
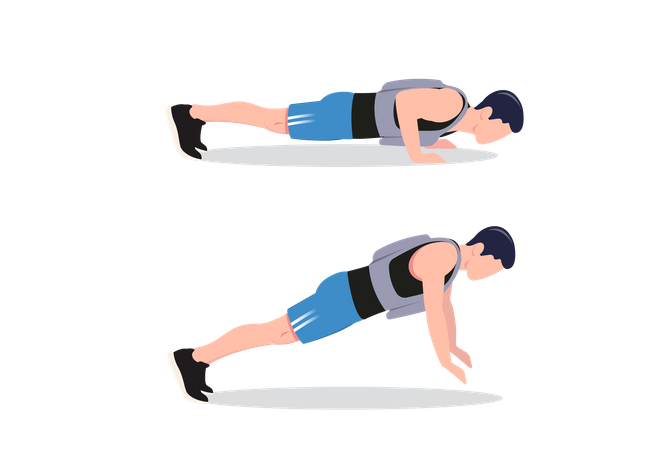
Let’s talk about those plyometric push-ups for explosive power. I used to hate these with a passion until I figured out the proper progression. Here’s what worked for me and my clients: start with decline push-ups on a box, master those, then add a small “push” at the top. Gradually increase the power until you can get that slight “float” at the top. The key is keeping your core tight – I learned that the hard way after face-planting once (okay, maybe twice).
Progressive overload is crucial, but here’s something I discovered through trial and error: with advanced techniques, it’s not always about adding weight. Sometimes it’s about increasing time under tension or decreasing rest periods. I’ve seen incredible results using a 4-second negative on decline presses, especially when paired with a one-second pause at the bottom.
Speaking of advanced techniques, let me share my favorite finisher: the mechanical advantage giant set. Start with decline dumbbell flyes (hardest), move to decline dumbbell press (medium), and finish with decline close-grip press (easiest). Use the same weight throughout – trust me, by the end, even light weights feel like they’re made of concrete!
Here’s a pro tip that took me ages to figure out: for really advanced training, vary your decline angles within the same workout. Start with a steeper decline (30 degrees) for your heavy compound movements, then decrease to 15 degrees for your isolation work. This hits the lower chest fibers from slightly different angles and has been a total game-changer for development.
The mind-muscle connection becomes even more critical at this level. I spend at least 5 minutes before each chest session doing activation work with light resistance bands. Focus on feeling every fiber contract. Yeah, you might look a bit silly doing “air flyes” with a band, but the results speak for themselves!
Remember, though – even as an advanced lifter, you need to check your ego at the door. I’ve seen too many people (myself included) try to go too heavy too fast with these techniques. Your form needs to be spot-on, or you’re just asking for trouble. These aren’t exercises where you can muscle through with sloppy form!
Creating the Perfect Lower Chest Workout Routine
Let me tell you about my journey to creating the perfect lower chest routine – and boy, was it a learning experience! After years of trial and error (and some pretty questionable workout plans), I’ve finally nailed down what actually works. I’ll share exactly what helped my clients transform their lower chest development, complete with the mistakes we made along the way.
First off, let’s talk about the ideal beginner routine. Here’s what I’ve found works like magic for newcomers:
Beginner Lower Chest Workout (2x per week):
– Decline Bench Press: 3 sets of 8-12 reps
– Cable Crossovers: 3 sets of 12-15 reps
– Decline Push-ups: 2 sets to failure
I remember when one of my clients couldn’t even do a single decline push-up. We started him with regular push-ups on a slight decline (using a yoga block), and within 6 weeks, he was cranking out full decline push-ups like a champ!
For intermediate lifters, here’s where things get spicy. This is the routine that’s given my clients the best results:
Intermediate Split (3x per week):
– Decline Barbell Press: 4 sets of 6-10 reps
– Decline Dumbbell Flyes: 3 sets of 10-12 reps
– Cable Crossovers: 3 sets of 12-15 reps
– Landmine Press: 3 sets of 10-12 reps
Pro tip that took me way too long to figure out: rest periods matter big time! For compound movements like the decline press, rest 2-3 minutes between sets. For isolation exercises like flyes, 60-90 seconds is plenty. I used to rush between sets thinking more volume equals better results – spoiler alert: it doesn’t!
Now, for my advanced lifters, here’s the routine that separates the men from the boys (or women from the girls!):
Advanced Training Split (4x per week):
– Heavy Decline Press: 5 sets of 4-6 reps
– Decline Dumbbell Press: 4 sets of 8-10 reps
– Superset: Cable Flyes + Decline Push-ups: 3 sets of 12-15 reps each
– Drop Set: Decline Dumbbell Flyes: 2 sets to failure
Let’s talk about the elephant in the room – recovery. You absolutely cannot hit these workouts hard without proper rest. I learned this the hard way when I tried training lower chest every other day and ended up with zero progress and cranky shoulders. For beginners, 48 hours between sessions is mandatory. Advanced lifters might need 72 hours, depending on intensity.
Here’s something that revolutionized my clients’ results: pre-exhaust techniques. Try doing your isolation exercises (like cable flyes) BEFORE your compound movements. Sounds backwards, right? But trust me, this helps establish that mind-muscle connection and can lead to better overall development.
The biggest mistake I see people make? Not properly warming up. Here’s my tried-and-true warm-up sequence:
1. 5 minutes of light cardio to get the blood flowing
2. Arm circles and scapular retractions: 2 sets of 15
3. Band pull-aparts: 2 sets of 20
4. Push-ups with increasing decline: 3 sets of 5
One thing I wish someone had told me earlier: track your progress! Not just weights and reps, but also how the exercises feel. Some of my best program adjustments came from reading through my training notes and spotting patterns in what worked and what didn’t.
Remember that sweet spot for hypertrophy (muscle growth) happens between 8-12 reps for most people. But – and this is crucial – you need to be using a weight that makes those last two reps challenging. I see too many folks using weights they could lift 20+ times and wondering why they’re not seeing changes.
And please, for the love of gains, don’t forget about proper form! I’d rather see someone do 5 perfect reps than 15 sloppy ones. Keep your shoulder blades pulled back and down, maintain control throughout the movement, and focus on feeling your lower chest working. It’s not just about moving weight from point A to point B.
There you have it – the blueprint for lower chest development that I wish I’d had when I started. Remember, consistency beats intensity every time. Stick to these routines for at least 8 weeks before making any major changes. Your lower chest will thank you!
Common Mistakes and How to Avoid Them
You know what gets me fired up? Seeing the same training mistakes I made early in my career still tripping people up today! After spending years correcting these issues with hundreds of clients, I’ve got some hard-earned wisdom to share about what NOT to do when training your lower chest.
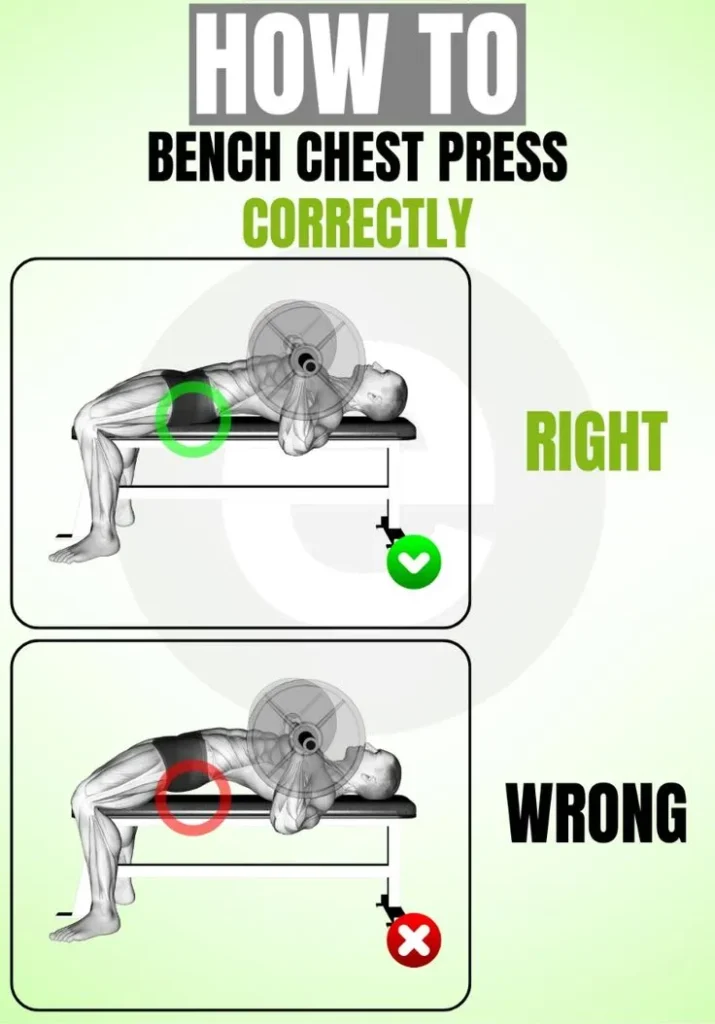
Let me tell you about my biggest form faux pas – bouncing the bar off my chest during decline bench press. Man, I thought I was being explosive, but all I was doing was asking for a shoulder injury! Here’s the deal: control is everything. I teach all my clients to imagine they’re lowering the weight onto a piece of glass. You want to touch your chest, not crash into it!
Speaking of breathing – holy moly, this is a game-changer that most folks mess up! I remember coaching this one client who kept getting dizzy during his sets. Turns out he was holding his breath through the entire movement! Here’s the golden rule I now teach: inhale during the negative (lowering) portion, exhale forcefully through your mouth during the press. It’s like letting air out of a balloon – controlled and steady.
Let’s talk about ego lifting (guilty as charged!). I spent my first two years trying to decline press way more than I should have. You know what that got me? Terrible form and a shoulder impingement that took months to fix. Here’s my hard-learned tip: if you can’t control the weight for at least 3 seconds on the way down, it’s too heavy. Period.
One mistake that drives me absolutely bonkers is seeing people rush between sets. Listen, your lower chest needs time to recover between sets – this isn’t a cardio workout! I’ve found the sweet spot is:
– 2-3 minutes for heavy compound movements
– 90 seconds for isolation exercises
– 60 seconds for finishing movements
Balance is another huge issue I see constantly. You can’t just hammer your lower chest and ignore the rest of your pecs! I learned this lesson when my chest started looking like two different muscles. Now I maintain a 2:1 ratio – for every two lower chest exercises, I include one upper chest movement.
Here’s a shoulder health tip that saved my training career: always, always, ALWAYS warm up your rotator cuff before chest training. I do this quick routine that takes just 5 minutes:
– Band external rotations: 2×15 each arm
– Face pulls: 2×15
– Arm circles: 30 seconds forward, 30 seconds backward
Let’s address the elephant in the room – overtraining. I see this all the time with enthusiastic beginners. More is not better, folks! Your lower chest needs at least 48 hours to recover between serious training sessions. I learned this the hard way when my progress completely stalled for three months because I was hitting chest every other day.
Temperature check: are you constantly feeling shoulder pain during chest exercises? That’s usually a sign of poor scapular positioning. Keep those shoulder blades pulled back and down throughout the entire movement. Think about squeezing a pencil between your shoulder blades – this cue has helped countless of my clients fix their form.
The “more weight equals more gains” myth needs to die! I’ve seen better chest development in clients using moderate weights with perfect form than those trying to break PR’s every session. Focus on feeling the muscle work – if you can’t feel your lower chest engaging, drop the weight and reset your form.
One subtle mistake that took me years to figure out: not adjusting decline angles based on body proportions. If you’re shorter, you might need a steeper decline to hit your lower chest effectively. Taller? A shallower angle often works better. Don’t be afraid to experiment with different angles until you find your sweet spot.
And please, for the love of gainz, stop comparing yourself to social media! I had this client who kept trying to copy exercises he saw on Instagram – most of which were either dangerous or ineffective. Stick to the proven movements we know work: decline presses, cable work, and controlled flyes.
Remember, building a strong lower chest is a marathon, not a sprint. Every mistake I’ve mentioned? I’ve made them all! But learning from these mistakes and adjusting your training accordingly is what separates those who make progress from those who stay stuck. Keep these tips in mind, and you’ll be well on your way to better chest development!
Nutrition and Recovery for Chest Development
Let me tell you something that completely changed my approach to chest training – nutrition and recovery are just as important as the actual workouts! After struggling for years with subpar results, I finally realized that what I was doing outside the gym was holding me back. Here’s what I’ve learned through years of trial, error, and working with countless clients.
First up, let’s talk protein – the building block of muscle growth. I used to think I was getting enough protein until I actually tracked my intake. Boy, was I wrong! For optimal chest development, I’ve found that consuming 0.8-1g of protein per pound of body weight works like magic. One of my clients transformed his results just by hitting this target consistently. His favorite protein-packed meal? Grilled chicken breast with quinoa and roasted veggies about 2 hours before training.
Timing your meals around chest workouts is crucial, folks! Here’s what’s worked best for my clients:
– Pre-workout (2-3 hours before): Complex carbs + moderate protein
– Post-workout (within 30 minutes): Fast-digesting carbs + protein
– Evening meal: Slow-digesting protein + healthy fats
Let me share a game-changing tip about post-workout nutrition. I used to rush home to cook after chest sessions, but by then, I’d missed the prime recovery window. Now I always pack a protein shake with quick-digesting carbs (like a banana) in my gym bag. The difference in recovery has been night and day!

Speaking of recovery – holy smokes, did I learn this lesson the hard way! Sleep is absolutely non-negotiable for chest development. I remember trying to build my chest while getting only 5-6 hours of sleep per night. Spoiler alert: it didn’t work! Aim for 7-9 hours of quality sleep, especially on chest training days. Your muscles grow during rest, not during workouts!
Hydration is another factor that took me way too long to take seriously. For every intense chest session, you should be drinking:
– 16-20 oz water 2 hours before training
– 8-10 oz every 15 minutes during training
– 16-20 oz for every pound lost through sweat post-workout
Here’s something that revolutionized my recovery: proper supplementation. Now, I’m not talking about magic pills, but these basics have made a real difference:
– Creatine monohydrate: 5g daily
– Magnesium: 400mg before bed (helps with muscle recovery)
– Vitamin D3: 2000-4000 IU daily (especially if you’re not getting much sun)
One mistake I see all the time is people skimping on healthy fats. Your hormone production – including testosterone, which is crucial for muscle growth – depends on adequate fat intake! Include sources like avocados, nuts, olive oil, and fatty fish in your daily diet. I noticed a huge difference in my recovery when I stopped following super low-fat diets.
Listen up, because this is important: inflammation management is key for chest recovery. I learned to incorporate these anti-inflammatory foods into my diet:
– Tart cherry juice before bed
– Turmeric with black pepper in my post-workout shake
– Plenty of leafy greens with meals
Recovery techniques have been total game-changers for my chest development. Here’s my go-to recovery routine:
– 10 minutes of light stretching post-workout
– Foam rolling the chest and surrounding muscles
– Using a lacrosse ball for trigger point release
– Cold shower or ice pack for 5-10 minutes after intense sessions
Don’t forget about stress management! High cortisol levels can wreck your recovery and gains. I’ve seen clients make better progress once they started incorporating simple stress-reduction techniques like deep breathing exercises or 10 minutes of daily meditation.
The bottom line? Your chest doesn’t grow during your workout – it grows during recovery. Give your body the nutrients and rest it needs, and you’ll be amazed at how much faster you progress. Trust me, I wish I’d learned these lessons years ago!
Building an impressive lower chest doesn’t happen by accident – it requires dedicated training, proper form, and consistent effort. By incorporating these proven exercises and following our comprehensive guide, you’ll be well on your way to achieving that full, balanced chest development you’re after. Remember, progress takes time, but with these targeted workouts and expert tips, you’ll see results faster than ever. Ready to transform your chest training? Start implementing these exercises today!


