Have you ever wondered how to build an impressive chest with just a pair of dumbbells? According to a 2023 study in the Journal of Strength and Conditioning Research, dumbbell exercises can activate up to 30% more muscle fibers compared to barbell movements! I’ve spent years helping clients transform their chests using nothing but dumbbells, and today I’m sharing the most effective exercises that deliver real results. Whether you’re working out at home or in the gym, these proven chest dumbbell exercises will help you build the strong, defined chest you’ve been dreaming of!
Essential Chest Dumbbell Exercises for Maximum Growth
Let me tell you about my journey with dumbbell chest exercises – it’s been quite the ride! After 15 years as a personal trainer, I’ve learned that mastering these fundamental movements is absolutely crucial for building an impressive chest, whether you’re working out at home or hitting the gym.
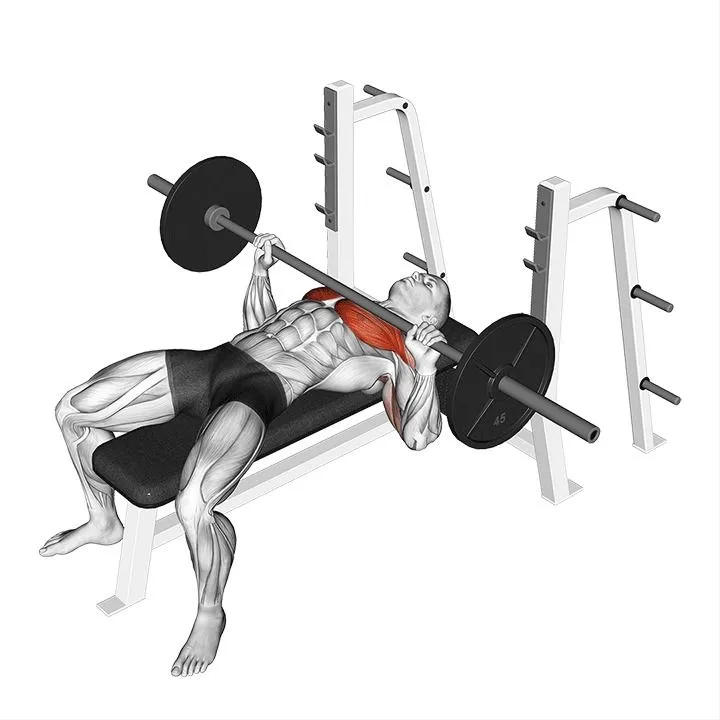
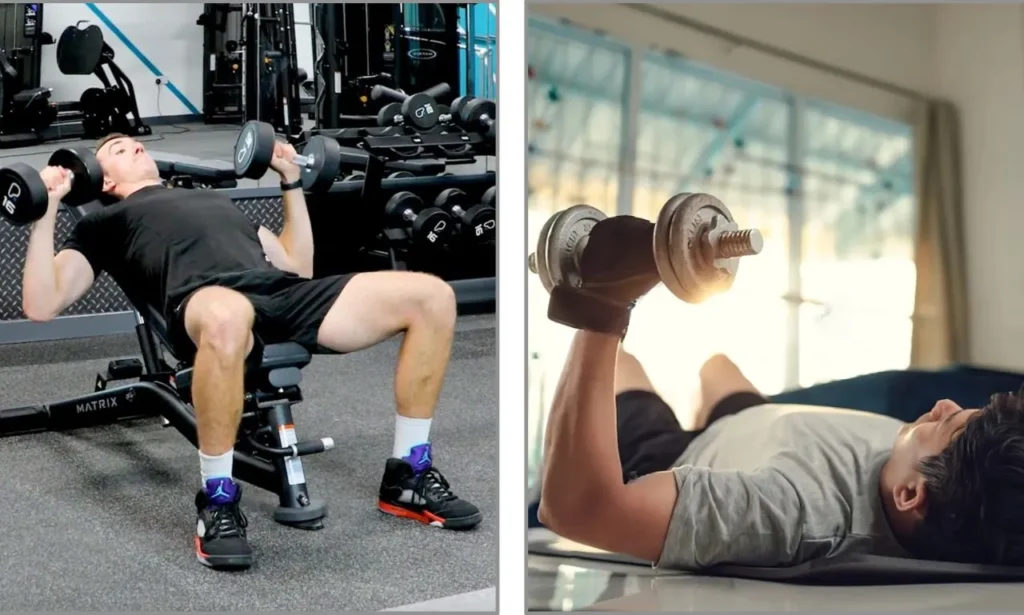
First up, let’s talk about the dumbbell flat bench press – the exercise that completely transformed my approach to chest training. I still remember my early days when I’d just throw the weights up without any real technique. Big mistake! Here’s what I discovered works best: Start by setting up with your feet firmly planted and your shoulder blades squeezed together (this is super important for stability). Grip those dumbbells with your palms facing forward, and lower them slowly to about an inch above your chest. The game-changer? Keep your elbows at roughly a 45-degree angle from your body – not flared out wide like I used to do!
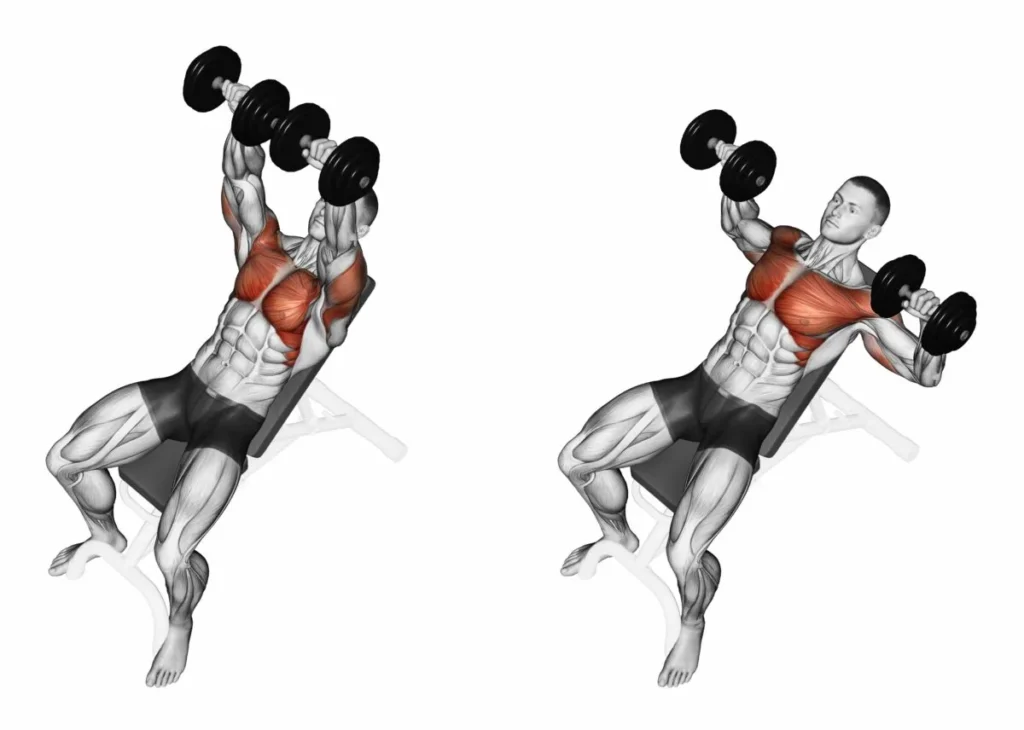
You know what’s funny? When I first started teaching the incline dumbbell press to clients, I thought a steeper incline meant better upper chest development. Wrong again! Through trial and error (and a whole lot of research), I found that a 30-degree incline is actually the sweet spot for upper chest activation. Any steeper and you’re shifting too much emphasis to the front delts.
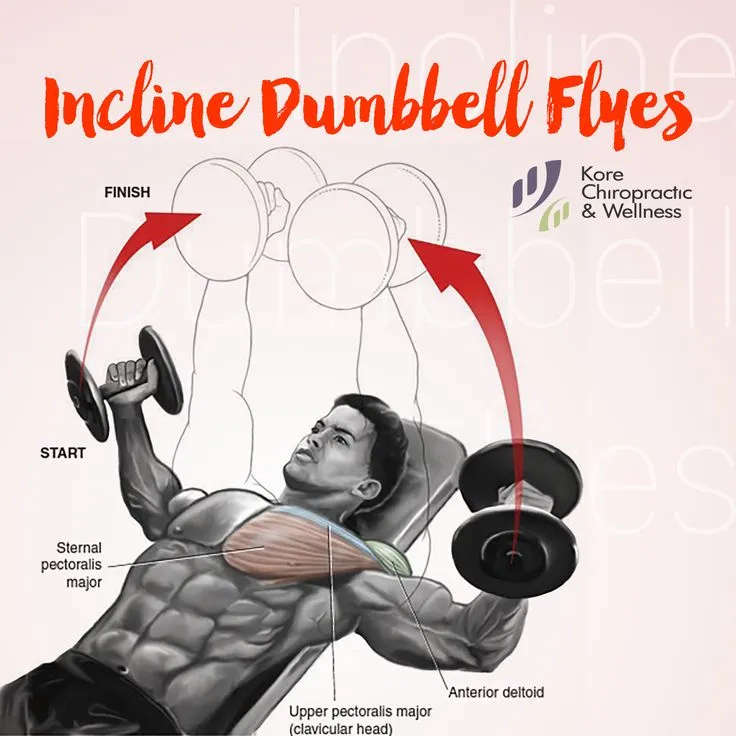
Let me share a quick story about the dumbbell fly – an exercise that honestly humbled me real quick. I was working with a client who could bench press like nobody’s business, but his chest development was lagging. We scaled back the weight on his flyes (way back!) and focused on feeling that stretch across the chest. Within three months, his chest development improved more than it had in the previous year. The key? Using a weight that allows for a full stretch at the bottom while maintaining control throughout the movement.
Here’s something that took me years to figure out – the power of the squeeze. At the top of each pressing movement, try squeezing your chest muscles together for a one-second count. It might not sound like much, but this little tweak has made a world of difference for both me and my clients. It’s all about that mind-muscle connection!
For decline dumbbell presses (which, let’s be honest, are often overlooked), I’ve found that setting up with a slight decline of about 15 degrees works wonders for lower chest development. But here’s the catch – you’ve got to keep your core engaged throughout the movement. I learned this the hard way after a particularly uncomfortable session where my lower back was not happy with me!
One thing that’s absolutely critical – and I can’t stress this enough – is starting with a weight that allows for perfect form. I see so many folks in the gym trying to press heavy dumbbells with form that makes me cringe. Trust me, I’ve been there! Start with a weight you can control for 12-15 reps with perfect form, then gradually increase from there.
Through years of experimentation, I’ve found this combination of exercises, performed with proper form and progression, consistently delivers results. Remember, though – progress in chest development isn’t just about moving weight from point A to point B. It’s about creating tension, maintaining control, and really focusing on the muscle working throughout each rep.
The best part about these dumbbell exercises? They’re incredibly versatile. Whether you’re working with 10-pound dumbbells or 100-pounders, these movements can be adapted to any fitness level. Just remember to progress gradually and always prioritize form over weight – something I wish someone had drilled into my head when I first started!
Complete Dumbbell-Only Chest Workout Routines
Let me share my go-to dumbbell chest routines that I’ve refined over years of training both myself and my clients. I still remember when one of my first clients, Mike, came to me frustrated because he only had access to dumbbells in his apartment gym. Man, did we prove you can build an impressive chest with just dumbbells!
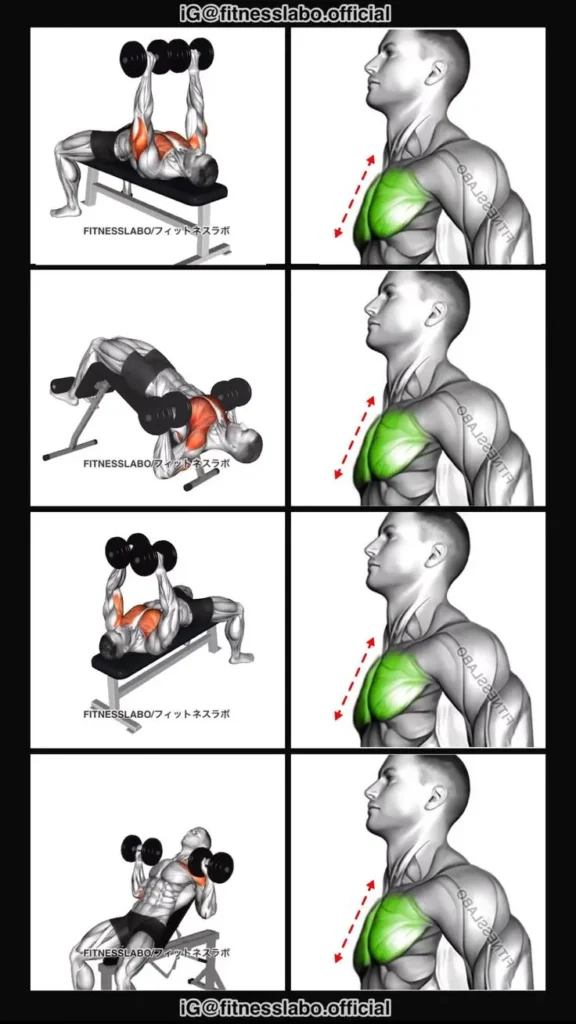
Let’s start with my favorite beginner routine – the one that’s helped countless newbies build their foundation. Here’s the exact exercise that’ll take about 20 minutes:
1. Flat Dumbbell Press: 3 sets of 10-12 reps
Start with a weight you can control perfectly (seriously, check your ego at the door here). I learned this lesson the hard way when I first started training! Rest 90 seconds between sets, and focus on feeling your chest muscles working with each rep.
2. Incline Dumbbell Press: 3 sets of 12-15 reps
Set that bench to 30 degrees – trust me on this one. I used to set it way too steep and wondered why my shoulders were doing all the work! Keep the movement slow and controlled, especially on the way down.
For intermediate lifters ready to kick things up a notch, here’s a 45-minute chest-blaster that’s been tested and proven:
1. Flat Dumbbell Press: 4 sets of 8-10 reps
2. Incline Dumbbell Press: 3 sets of 10-12 reps
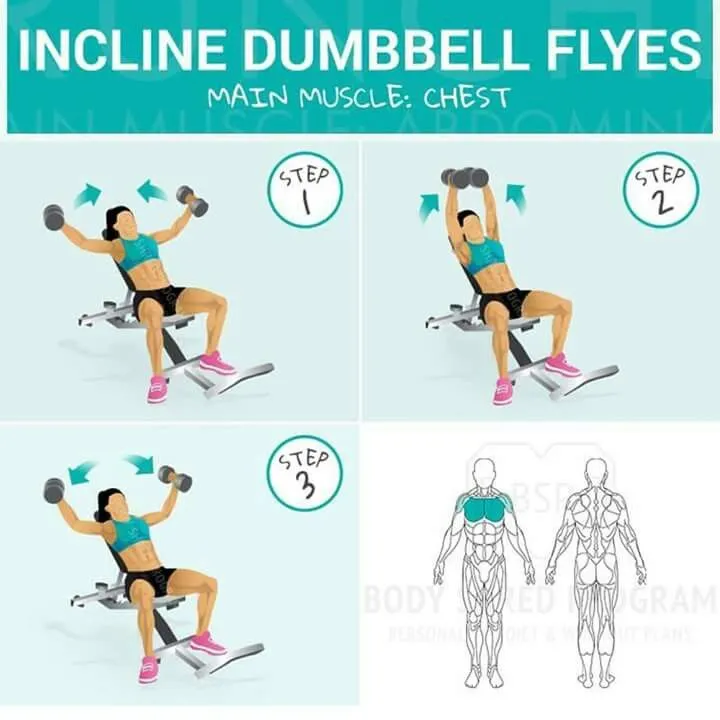
3. Dumbbell Flyes: 3 sets of 12-15 reps
4. Close-Grip Dumbbell Press: 3 sets of 12-15 reps
I remember struggling with this exercise when I first tried it – could barely lift my arms to wash my hair the next day! But stick with it, and you’ll see amazing results. Just make sure you’re eating enough protein to support recovery (learned that one the hard way too).
Now, for my advanced lifters, here’s where things get spicy! This is the routine that completely transformed my chest development:
Superset 1 (4 rounds):
– Incline Dumbbell Press: 8-10 reps
– Immediately into Incline Flyes: 12-15 reps
Rest 90 seconds
Superset 2 (3 rounds):
– Flat Dumbbell Press: 8-10 reps
– Immediately into Flat Flyes: 12-15 reps
Rest 90 seconds
Finisher:
Drop set on Close-Grip Dumbbell Press:
Start with a weight you can press 8 times, drop 25-30% weight, rep out, drop again, rep out. Trust me, your chest will be on fire!
Here’s something crucial I’ve learned about recovery: for beginners, hitting chest twice a week is perfect. More advanced lifters can bump it up to three times, but you’ve got to space those sessions out properly. I usually recommend Monday/Thursday or Monday/Wednesday/Friday splits.
Working out at home? No problem! Here’s how to modify these routines if you’re limited on equipment. The key is to increase time under tension and really focus on the squeeze at the top of each movement. You can even do floor presses if you don’t have a bench – not ideal, but I’ve seen great results with clients who only had this option.
One thing that took me forever to figure out was the importance of proper warm-up sets. Don’t just jump into your working sets! Start with 5-10 minutes of arm circles, push-ups, and light dumbbell work to get the blood flowing. Your shoulders will thank you later.
The biggest mistake I see people make? Rushing through their reps. Slow it down! I always tell my clients to think about drawing a straight line from their shoulders to the ceiling on pressing movements. And for flyes? Imagine you’re hugging a big tree – sounds silly, but it works every time!
Remember, consistency trumps intensity every single time. I’ve seen better results from clients who stuck to these routines three times a week than those who destroyed themselves once a week trying to be a hero. Your chest will grow with patience and proper form – that’s something 15 years in the game has taught me for sure!
Form and Technique Mastery
Let me tell you about the day that completely changed how I approach chest training technique. I was working with a client – we’ll call him Tom – who could lift impressive weights but wasn’t seeing the chest development he wanted. That’s when we stripped everything back and rebuilt his form from the ground up. The results? Absolutely game-changing!
First, let’s talk about breathing patterns, because this is where most people (myself included) mess up. You know how some folks just hold their breath throughout the whole set? Been there, done that, got the dizzy spells to prove it! Here’s what actually works: Take a big breath into your belly before lowering the weight, hold it through the descent and initial push, then exhale forcefully through the sticking point. It’s like creating a natural weightlifting belt for your upper body.
The biggest “aha!” moment in my training career came when I finally understood scapular retraction. Picture this: I spent years just laying on the bench, pressing weights without thinking about my shoulder blades. Then a mentor showed me how to “put my shoulders in my back pockets” before starting each set. The difference was mind-blowing! Your shoulder blades should be squeezed together and down, creating a stable platform for pressing.
Let’s talk about range of motion – and boy, do I have some stories about this one! I used to think that touching the dumbbells to my chest on every rep was showing off good mobility. Wrong! What I discovered through working with physical therapists is that optimal range of motion varies person to person. Here’s what to look for: lower the weights until you feel a good stretch in your chest, but not so far that your shoulders roll forward. For most people, this means stopping about an inch above your chest.
Speaking of mistakes (and I’ve made plenty), here are the big ones I see constantly:
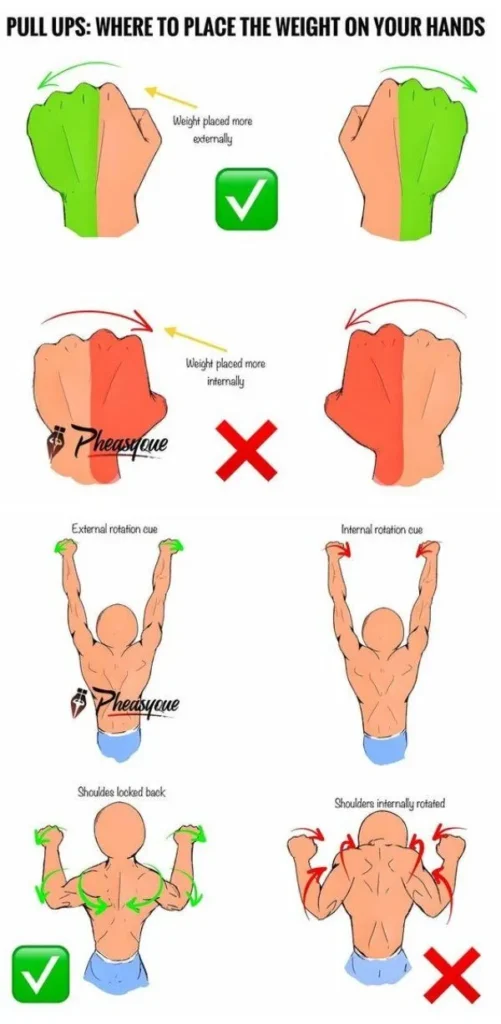
– Flaring the elbows out wide (your poor shoulder joints!)
– Bouncing the weights off the chest
– Letting the dumbbells drift forward or backward during presses
– Lifting the butt off the bench (guilty as charged, especially in my early days!)
The game-changer for maintaining tension? Think about trying to bend the dumbbells in half during every rep. Sounds weird, right? But this little mental cue activates your chest like crazy. I remember the first time I tried this – my chest was sore in places I didn’t even know existed!
Here’s something that took me years to figure out: the position of your wrists during pressing movements matters way more than most people think. Keep them straight, like you’re punching toward the ceiling. I can’t tell you how many clients I’ve seen trying to press with bent wrists, wondering why their forearms hurt more than their chest.
Temperature makes a difference too – something I learned the hard way during winter training sessions. Your chest muscles need a proper warm-up when it’s cold. I start every session with arm circles, light band work, and a few sets of push-ups before touching the dumbbells. Trust me, your rotator cuffs will thank you!
The most underrated aspect of chest training? The negative (lowering) portion of each rep. I spent years focusing only on pushing the weight up until a strength coach showed me the light. Now I tell all my clients to take 2-3 seconds on the way down. It’s not as flashy as pushing big weights, but it’s where the real magic happens for muscle growth.
You know what really helped me perfect my form? Recording myself from different angles during training. Talk about a humbling experience! But seeing yourself on video doesn’t lie – it shows every little form break and compensation pattern. These days, I do form check videos with clients every few months to ensure we’re staying on track.
Remember folks, mastering form isn’t just about preventing injury (though that’s super important). It’s about making every single rep count toward your goals. As one of my mentors used to say, “The weight is just a tool – it’s how you use it that matters.” After 15 years in the game, I couldn’t agree more!
Programming and Progressive Overload
Let me tell you about a transformative lesson in progressive overload I learned while working with a client named James. He’d been stuck bench pressing the same 40-pound dumbbells for months, frustrated and ready to quit. What happened next completely changed how I approach chest programming!
First things first – let’s break down the ideal weekly structure for chest development. After years of experimenting, I’ve found that hitting chest 2-3 times per week works best for most people. Here’s how I structure it:
Monday: Heavy pressing focus
Wednesday: Higher rep, pump-focused work
Friday: Mixed intensity (if doing 3 sessions)
Now, about those sets and reps… Here’s what I’ve found works like magic:
– Strength focus: 4-6 sets of 6-8 reps
– Muscle growth: 3-4 sets of 8-12 reps
– Endurance/pump work: 2-3 sets of 12-15 reps
Let me share something I wish I’d known earlier about progressive overload with dumbbells. Most folks think it’s just about adding weight – I sure did! But here’s the real deal: there are multiple ways to progress, and I use them all with my clients:
1. Weight increments (the obvious one)
2. Additional reps with the same weight
3. Decreased rest periods
4. Increased time under tension
5. Enhanced range of motion
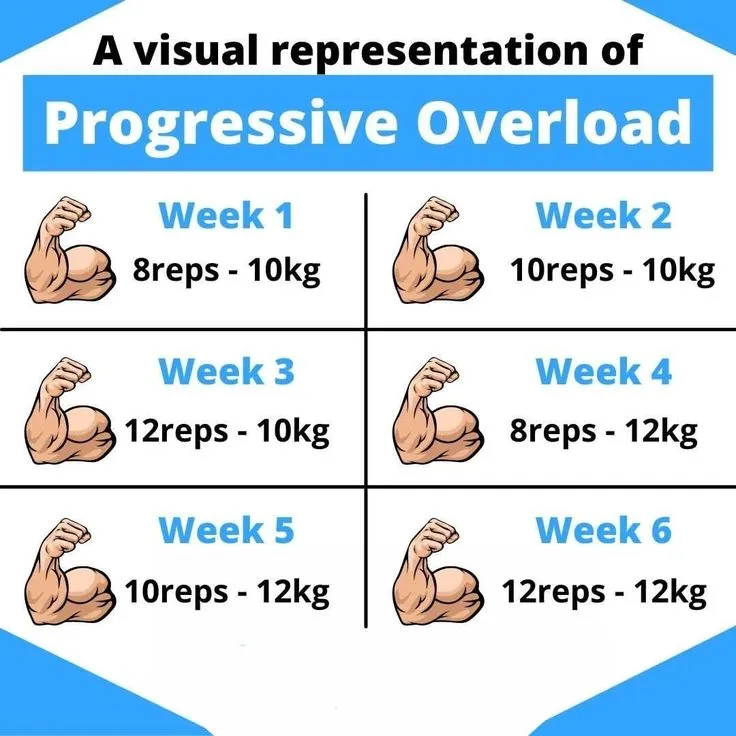
I remember working with James, and when we couldn’t increase the weight, we focused on adding just one rep per week to each set. Within two months, he was doing 15 clean reps with those same 40-pounders, and his chest had visibly grown!
Speaking of plateaus (and boy, have I hit my share), here’s my tried-and-true strategy for breaking through them:
Week 1-3: Focus on volume with moderate weights
Week 4: Deload week (reduce volume by 40%)
Week 5-7: Push for new weight PRs
Week 8: Another deload
One mistake I see all the time – and I was guilty of this too – is trying to progress too quickly. Listen, I get it! We all want those gains yesterday. But here’s what I’ve learned: aim to increase dumbbell weight by 2.5-5 pounds every 2-3 weeks for pressing movements. Any faster and your form usually goes out the window.
Here’s a cool trick I learned for maintaining progression when you don’t have access to a full rack of dumbbells: play with tempos. Start with a normal tempo, then gradually increase the lowering phase from 2 seconds to 4 seconds. Once you can handle that, try pausing for 2 seconds at the bottom. It’s brutal but effective!
Rest periods are crucial too – something I learned the hard way after years of trying to rush through exercises. For heavy sets (6-8 reps), rest 2-3 minutes between sets. For moderate rep ranges (8-12), 90 seconds to 2 minutes works well. Higher rep sets (12-15) can handle shorter rest periods of 60-90 seconds.
Let me tell you about my favorite progression tracking method – the workout journal. Yeah, I know it sounds old school, but I’ve never found a better way to ensure consistent progress. Write down everything: weights, reps, rest periods, and how the sets felt. Looking back at my old journals is like reading a roadmap of what worked and what didn’t.
Remember this golden rule: progress should feel challenging but achievable. If you’re grinding out ugly reps just to hit a number, you’re probably pushing too hard. I learned this lesson after tweaking my shoulder trying to force progress too quickly. Now I tell all my clients: “Smooth progress is sustainable progress.”
The key to successful programming isn’t just about the exercises – it’s about listening to your body while consistently pushing its limits. Some days you’ll feel like a superhero, others like you can barely lift the light dumbbells. That’s totally normal! The magic happens when you stay consistent with the program while making small, strategic adjustments along the way.
Trust me on this one – I’ve seen more chest development from people following a structured progression plan than those who just wing it with random heavy sessions. It might not be as exciting, but it works every single time!
Safety and Injury Prevention
Let me share a personal wake-up call about chest training safety that changed everything for me. Back in my early training days, I skipped warming up (yeah, I was that guy) and ended up with a nasty shoulder impingement that kept me out of the gym for weeks. Now, I’m almost religious about proper warm-ups and injury prevention!
Speaking of warm-ups, here’s my bulletproof routine that I’ve developed over years of training:
– 5 minutes of arm circles and shoulder rolls
– 2 sets of 15-20 band pull-aparts
– 15-20 wall slides
– 2 sets of 10 push-ups with perfect form
– Light dumbbell presses (about 30% of working weight)
You wouldn’t believe how many shoulder issues I’ve helped clients avoid with just this simple routine. The key? Getting blood flowing to those rotator cuff muscles before hitting the heavy stuff.
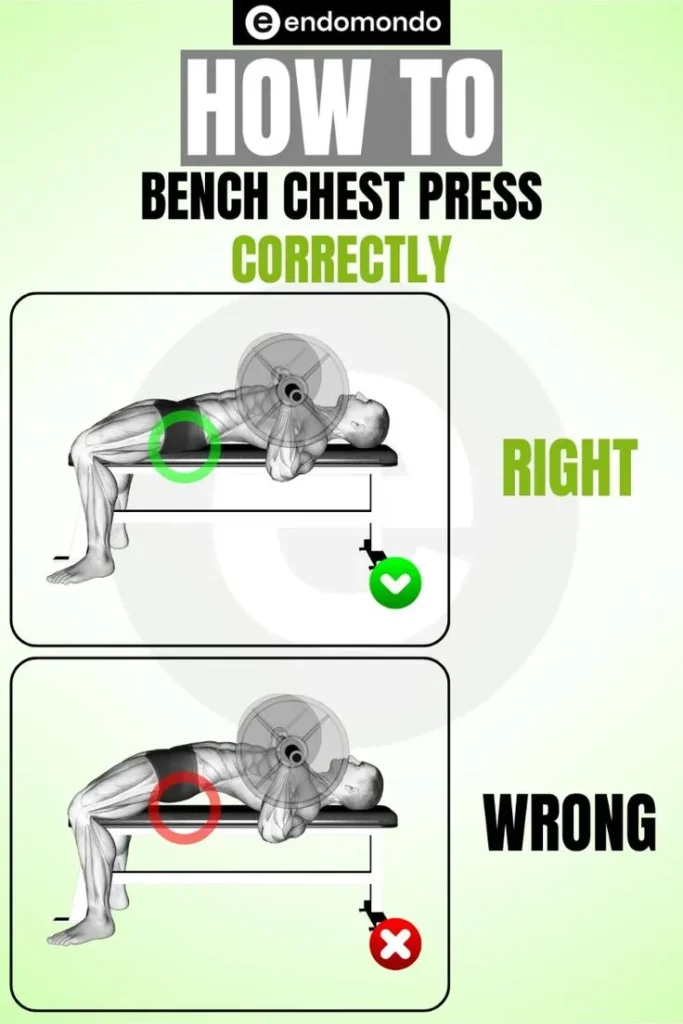
Image Source: endomondo.com
Let’s talk about joint health – something I wish someone had properly explained to me when I started lifting. Your shoulders are incredibly mobile joints, which makes them super vulnerable during chest training. Here’s what I’ve learned works best for keeping them healthy:
1. Never let your elbows drop below your shoulders during flyes
2. Keep your shoulder blades tucked down and back during all pressing
3. Stop any exercise immediately if you feel pinching in your shoulders
I remember working with a client who ignored some early warning signs of overtraining – classic case of “no pain, no gain” mentality. His symptoms included:
– Decreased strength in regular working sets
– Persistent shoulder ache
– Trouble sleeping on his side
– Lack of motivation to train
We immediately scaled back his training, and guess what? After two weeks of lighter work, he came back stronger than ever! The lesson? Sometimes less really is more.
Here’s something that took me years to figure out – the relationship between chest training and posture. Many of us (myself included) spend hours hunched over computers, which creates tight pecs and weak upper back muscles. The solution? For every pushing exercise, you need to do a pulling exercise. It’s not sexy, but it works.
Let me share my non-negotiable rules for safe dumbbell chest training:
1. Never bounce weights off your chest
2. Always have a spotter for heavy sets
3. Use dumbbells you can control throughout the entire range of motion
4. Keep your feet planted firmly on the ground
5. Maintain a natural arch in your lower back
One thing that really opened my eyes was working with a physical therapist after my shoulder injury. They taught me that mobility work isn’t just something you do when you’re hurt – it’s preventative maintenance! Now, I spend 10-15 minutes daily on shoulder mobility, especially on chest training days.
Here’s a reality check about training frequency: more isn’t always better. I see lots of folks destroying their chest three times a week with heavy sessions. Through experience (and plenty of trial and error), I’ve found that most people do best within 48-72 hours between intense chest exercises. Your muscles need time to recover and rebuild!
The most underrated aspect of injury prevention? Sleep and hydration. I can’t tell you how many times I’ve seen people try to push through heavy chest exercises while sleep-deprived and dehydrated. That’s just asking for trouble! Aim for 7-8 hours of sleep and drink water throughout the day – your joints will thank you.
Remember, progress is great, but staying injury-free is what allows for long-term success. As one of my mentors used to say, “The best exercise is the one you can do again tomorrow.” After 15 years of training and coaching, I couldn’t agree more. Take care of your body, and it’ll take care of you!


